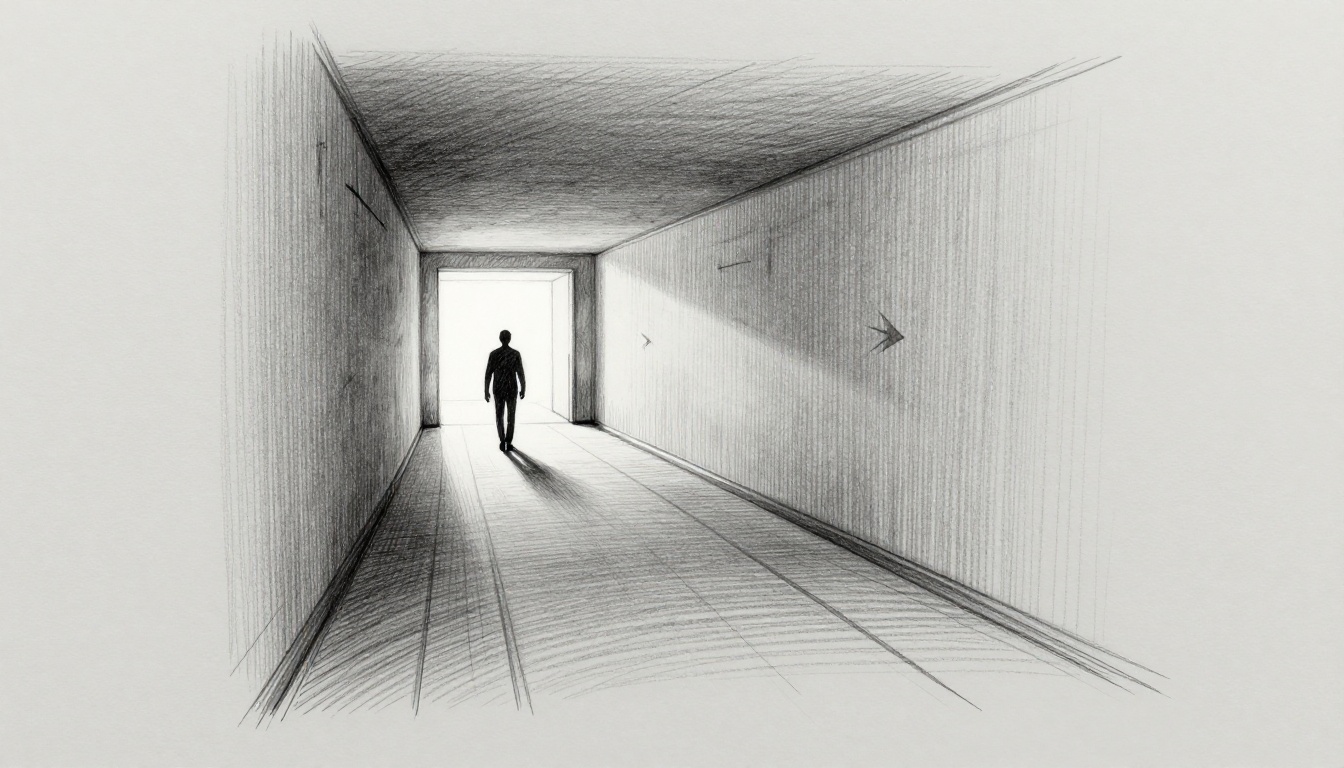
You boot up your indie game, excited for the next level. But five minutes in, you’re wandering dark corridors, no clue where to go. Frustration hits; you quit and delete the app.
Now picture this: the same setup, but subtle paths draw your eye forward. Shafts of light highlight the way, pulling you deeper without a single tutorial pop-up. Players flow through effortlessly, hooked from start to finish.
That’s the power of leading lines in game design and smart lighting to guide players. These tools tap into how our brains work, creating natural flow that boosts immersion. No hand-holding needed; instead, you build levels that feel alive. For example, good design lifts player retention by 30-50%, based on industry benchmarks from GDC reports. Indies and hobbyists see huge wins here, as it cuts drop-off and amps up reviews.
In this post, you’ll grab practical steps to spot natural paths, layer spotlight effects, and blend them for seamless guidance. First, let’s break down what makes a leading line pop.
Build Intuitive Paths with Leading Lines That Pull Players Forward
Leading lines guide players naturally through your levels. They work like roads or rivers in real life, drawing the eye and feet toward key spots. You cut confusion and build immersion because players sense the path without thinking.
These lines come in straight, curved, or converging types. Straight lines push fast progress, like a hallway to a boss door. Curved ones add flow and surprise, such as a river bend hiding treasure. Converging lines meet at focal points, like fences pointing to an exit. Place them from spawn to goal, layer a few for depth, but skip overload or levels feel forced.
In game level design, leading lines shine for indies. They boost retention since players stay engaged. Test them early; trace paths on paper sketches first. Unity’s Line Renderer or Unreal’s splines make tweaks easy. For 2D games, keep lines simple along the scroll. In 3D, add vertical pulls for climbs.
Now, spot what’s already there in your world.
Spot and Use Natural Lines in Your World
Your environment holds free leading lines. Cliffs edge toward drops, hallways stretch to doors, bridges span gaps. Scout them during layout walks. Start at spawn, note what pulls your gaze.
Forest paths wind between trees, urban streets align with buildings. These feel organic, so players trust the flow. They reduce backtracking because the world itself directs movement.
Enhance them subtly to fit realism. Add faint moss on rocks or cracks in walls that align. Avoid bright paints; that breaks mood.
Consider these examples:
- Cliffside trail: A sheer drop curves right, framing a cave mouth below.
- Ruined hallway: Fallen beams point to a lit archway ahead.
- Swamp bridge: Rickety planks converge on a distant platform.
In 2D platformers, use ground contours or vine drapes. 3D open worlds gain from horizon ridges. Sketch it rough: draw spawn circle, arrow along the cliff to the goal star. Players follow without maps.
This approach saves time. You build on assets instead of starting blank.
Design Custom Lines That Blend Seamlessly
Sometimes nature lacks lines, so craft your own. Rails along ledges, debris trails from fights, glowing moss paths in caves. Balance visibility; too dim confuses, too bold screams “go here.”
Aim lines at convergence points like doors or objectives. A rail starts wide at entry, narrows to the switch. That pulls focus tight.
Yet overuse kills surprise. If every path glows, players predict everything. Mix two or three per area max.
Here’s how to build them right:
- Rail guards: Curve them along drops, ending at ladders.
- Battle scars: Scorch marks lead from spawn to enemy camps.
- Nature tweaks: Fallen logs align toward secrets.
Unity lets you drag Line Renderers in scene view. Unreal Blueprints snap them to meshes fast. For 2D, pixel art paths in Aseprite export clean.
Test subtlety: dim alpha to 0.3, watch if eyes still track. In 3D, rotate camera; lines should hold from angles. Sketch a quick top-down: straight rail to door, debris fan out behind for layering.
Custom lines blend when they match textures. Players sense purpose, not tricks.
Position Lines for Smooth Progression
Start lines at spawn for instant direction. Curve them gently to secrets off main paths. Frame key views, like a vista from a ledge.
Vertical lines guide height, such as poles up towers or chains dangling down. They prevent lost jumps in multi-level zones.
Follow these rules:
- Link entry to exit directly first.
- Layer secondary curves for branches.
- Frame combats or pickups at ends.
Avoid overload by spacing; one dominant line per screen. In 2D side-scrollers, align with jumps. 3D benefits from depth layers, foreground to background.
Test flow simple: print mockups, trace with finger. Does it snag? Adjust curves smoother.
Picture a spawn sketch: straight path forks, left curve to chest, right up pole to sniper spot. Players progress smooth, find all without rage quits.
Position right, and levels breathe. You create rhythm that hooks players deep.
Illuminate the Way: Lighting Techniques That Highlight Critical Paths
Lighting takes player guidance up a notch. It pairs with those leading lines to set emotions and pull focus. Warm glows invite you along safe routes, while cool shades warn of risks. This game lighting to guide players adds mood, depth, and urgency without words. Rim lighting outlines paths, god rays pierce from windows, and volumetric fog builds mystery. Static lights hold steady moods for exploration; dynamic ones shift for combat or day-night cycles. You integrate them with level pacing, so tension rises as lights flicker. Tools like lightmapping bake efficiency, and probes capture bounces. Players feel directed, not spoon-fed.
Choose Light Colors and Intensity to Set the Mood
Warm oranges signal safe paths because they mimic firelight or sunsets. They comfort players, urging steps forward. Cool blues mark danger zones; they chill the air like deep caves or stormy nights.
Intensity draws eyes naturally. Start dim at branches, build bright gradients toward goals. This mimics streetlights at night, where pools of yellow pull you home through dark alleys.
For example, rim light edges a safe bridge in orange. It separates the path from black voids. God rays from a cracked ceiling spotlight the main trail, filtering dust motes for depth.
In Unity, tweak emission colors in post-processing. Unreal’s post-process volumes layer tints fast. Test on mobile; low-intensity saves battery. Players follow because brains trust warm invites over cold warnings.
Balance helps too. Overly bright paths flatten drama. Dial oranges to 60% saturation; blues stay crisp at 80%. Result? Smooth flow that matches your level’s pace.
Layer Shadows and Spotlights for Focus
Shadows block wrong turns effectively. Cast long ones across dead ends; they feel impassable. Spotlights hit correct paths, carving beams through fog for clear invites.
Silhouettes add punch. Backlight enemies or obstacles to darken false routes. This creates drama, like a boss looming in void-black.
Avoid flat scenes, however. Layer multiple lights: ambient fills base, spots punch focus, shadows define edges. Volumetric fog catches beams, boosting depth without performance hits.
Picture a dungeon fork. Spotlight rims the right tunnel orange; left wall drowns in blue shadow. God rays frame a distant chest. Players zero in fast.
Lightmapping bakes static shadows for speed. Probes handle dynamics, like torch sway. In combat, ramp spot intensity as foes spawn. Exploration stays calm with softer layers.
You gain urgency this way. Shadows push choices; spots reward right ones. Test angles: shadows hold from side views. Levels gain life, players push on.
Add Dynamic Lights for Responsive Guidance
Flickering torches guide night paths. They pulse gently, syncing with player steps for immersion. Moving searchlights sweep ahead, revealing turns as you approach.
These react to actions. Lights brighten on near-miss jumps; they dim behind for rear threats. Day-night shifts use them: dawn warms statics, dusk adds torch dance.
Performance matters on mobile. Limit dynamics to key paths; bake the rest. Unity’s light culling skips off-screen flickers. Unreal’s LODs fade distant ones.
Consider a chase level. Searchlight tracks you along rails, flickering intensifies with speed. Torches line escapes, pulsing to heartbeats. Players dash without pause.
Integrate with pacing. Calm zones use steady pulses; fights ramp chaos with strobes. Volumetric effects tie in, fog swirling under beams.
Start small: one torch per screen. Tween intensity 0.7 to 1.0 over time. Players sense life, follow cues instinctively. Your worlds pulse, retention climbs.
Combine Lines and Lights for Flawless Player Flow in Action
Lines give your levels solid structure. Lights then highlight them, creating pull that feels natural. Together, they guide players without effort, boosting flow in leading lines and lighting level design. Players move fast because eyes follow the path instinctively.
Start with a simple workflow. First, sketch your lines on paper or in tools like Unity’s scene view. Draw straight paths from spawn to goals, add curves for branches. Next, add lights: place spotlights along lines, use shadows to block dead ends. Test the combo early; adjust until it clicks.
This pairing shines in action. A curved rail gets a warm rim light, pulling eyes forward. Shadows darken side paths, so players ignore them. Result? Smooth progression that keeps immersion high.
Layer the Elements Without Clutter
Layer lines and lights for harmony, but keep it clean. Subtle rim lighting traces your lines without glare. For example, orange glows edge a debris trail at 30% intensity; it outlines without blinding.
Shadows hide distractions best. Cast them across false routes with backlights on obstacles. A wall blocks a dead end, its silhouette grows dark as you approach. Players veer away naturally.
Iteration fixes issues fast. Start basic: light one line per area. Playtest, note confusion spots. Add a second layer, like god rays piercing fog along the main path. Tweak colors; warm tones invite, cool ones warn.
Common pitfalls hurt flow. Clashing colors confuse, so match light tints to your lines’ textures. Overlighting flattens depth; dial intensities down 20%, watch shadows pop back. Test from angles; side views reveal weak spots.
In short, build layers step by step. Lines first for structure. Lights second for emphasis. Clean combos create flawless flow.
Study Pro Games and Test Your Own
Pro games nail this combo. Take The Last of Us: overgrown paths use vine lines lit by dramatic sunlight shafts. Shadows cloak infected zones, so you stick to the beam-lit trail. It builds tension perfectly.
Zelda caves rely on lantern glows. Dim lines of rock guide you; your torch rims them yellow, shadows swallow pits. Players explore confident, no lost hours.
Super Mario levels mix coin trails with glows. Shiny lines curve to jumps; spotlights hit them bright against dark pits. Simple, yet it hooks generations.
Ori and the Blind Forest adds grace. Silk lines weave through trees, bioluminescent lights pulse along them. Volumetric fog catches the glow, shadows frame dangers.
Test your setup like pros use heatmaps. Tools like Unity’s Profiler or freeware track eye paths. Hot zones show if lines and lights align.
Feedback loops work too. Share builds with five testers. Ask: “Where did eyes go first?” Note snags, iterate lights.
Use this playtesting checklist:
- Trace paths blindfolded, then with lights on.
- Time completion; cuts mean weak guidance.
- Check angles; rotate 90 degrees, confirm pull holds.
- Heatmap runs: three sessions minimum.
Advanced users add procedural hints. Generate lines with noise functions in Unity, light them dynamically via scripts. Torches follow player position, always rimming the next curve.
Action steps now: sketch one level today. Light lines subtle. Test with friends. Tweak shadows. Your players flow flawless, retention soars.
Conclusion
Leading lines set clear direction in your levels. Lights add emotion and focus. Together, they create magic that guides players smoothly.
You build worlds where players flow without frustration. They spot paths fast, stay immersed, and love every step. Leading lines and lighting level design turns confusion into joy, just like the smooth setups that hooked you from the start.
Sketch one level today with lines first, then lights. Share your results in the comments below. Sign up for the newsletter for more tips on player guidance.
What path will you light up next? “Visual storytelling speaks louder than words ever could.” – Game design pros know this truth.